


Podcast Articles, Truth for Teachers Collective | Mar 6, 2022
A peek inside one teacher’s lesson planning process (and how she streamlines to stay ahead)
By Megan Faherty
High School History/Social Studies
A peek inside one teacher’s lesson planning process (and how she streamlines to stay ahead)
By Megan Faherty
When I leave school every day, I am not only ready for the next day, I am ready for the rest of the week.
I almost never do planning or preparation the day before. Today I’m sharing how I plan in a way that allows me to work ahead like this.
My overall strategy boils down to making decisions about planning early, so my day-to-day work consists of simply implementing the decisions I’ve already made. I’ll describe the 9 steps of my process, including strategies to overcome obstacles to efficient planning, suggestions for team planning, and lessons I’ve learned from hybrid and virtual teaching over the last 2 years.
First a bit about my context. I teach high school social studies in a school with a 7-period day, of which teachers teach 5 periods, have lunch or study hall duty ½ period, and have prep 1 ½ periods. Most semesters, I teach 3 different classes. My state and district take a very hands-off, local control approach to curriculum. We have state social studies standards, but no mandated curriculum or textbook.
There is only one high school in my district, so there’s no need to coordinate curriculum with a different school, and our administrators trust our expertise in our subject area. So my department of 7 teachers is largely independent in deciding what and how to teach, as long as we meet the standards.
What my school requires for lesson plan documentation is very reasonable — we post general lesson plans, including the topic for each day, assignment due dates, and assessment dates, for students and parents each week. That’s it. We do not submit formal lesson plans to administrators, nor do we have to document every activity, standard alignment, or accommodation.
I know in many schools, the requirements for lesson plan documentation are extreme and time-consuming. If you’re required to do lesson plans in a way that doesn’t contribute to better teaching and learning, I encourage you to advocate for a reduction in your busywork.
I do Steps 1 & 2 in August before school starts (or before a new semester starts). When multiple people teach the same class or subject, these steps should be done together.
Listen to episode 250 below,
or subscribe in your podcast app
Sponsored by GreatSchools and Teacher Career Coach
Step 1: Decide on your units.
This means deciding on the basic structure of your class. The units may be designated by a state, district, or school-mandated curriculum, or you may need to decide them yourself. Depending on the subject, standards or textbooks may be a guide for units. It is essential to designate your units at the beginning of the year to enable advanced planning and to ensure you have time to teach your entire curriculum.
Do not just jump into the beginning without a clear plan.
Step 2: Count teaching days and divide them up by unit.
This step is also essential to do at the beginning of the year. If you don’t know exactly how much time you have for each unit, you cannot do advanced planning. This approach to planning is a gift I got from teaching Advanced Placement classes.
There are pros and cons to the AP program. One of the cons is the fact that I have to cover the entire curriculum by a certain date to prepare my students for the AP Exam. I cannot just skip a topic if I don’t get to it. (I should note that neither I nor my school regards the AP Exam as the most important outcome, but students and parents often do.) But the flip side of this con is the pro that this forced me to look at the big picture when planning towards the beginning of my career.
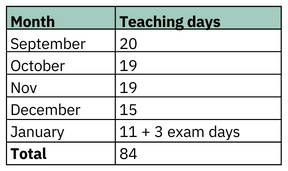
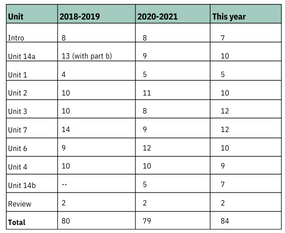
When I started teaching AP Psychology 15 years ago, among the first things I did was count how many teaching days I had before the exam, and divide them up by unit, based on the weight each unit has on the exam. Over the years, I’ve adjusted those day-counts based on my experience with topics that students need more or less time to understand, but the math is still pretty close to my original plan. I apply this approach to all my classes, whether AP or not, to ensure that I actually have time for the whole curriculum.
First, I count school days per month, taking into account vacations, professional development or teacher in-service days, assemblies, testing, and anything else that interrupts teaching — I try to eliminate any surprises. Then I list how many days I spent on each unit the year before, and make adjustments based on notes I took or my memory of what needed more or less time.
I do sometimes need to adjust this plan as I go through the semester or year — I might push a test back by a day or two. But I know from years of teaching AP, and years of planning this way, that taking an extra day or two on a topic always means sacrificing something important later. In this way, I avoid the end of semester or end of year panic about whether I’ll get through my curriculum.
I’ve had colleagues say they don’t have time to plan this way — they have to be ready for tomorrow, so there’s no time to consider the whole year now. I say that instead, you don’t have time not to plan this way. Make these decisions early, to enable true advanced planning later. And it’s never too late to make this plan. It may be [February], but you can take a huge planning burden off your plate for the rest of this year if you do this plan now.
Here’s what my first-semester plan looks like for AP Psychology from August. This year I compared to 2 different years because the last 2 years were … not typical. Once I decided on days per unit, I plugged those dates into my lesson plan document for each class.
By the first day of school or the first day of the second semester, I have steps 1 & 2 done for every class. Next, steps 3-7 are done unit by unit, and I generally have these steps done before a new unit starts. For example, I’m writing this on a Thursday night. In AP Psychology, I have a test next Tuesday, and I’m starting a new unit next Wednesday.
So tomorrow during my prep periods, I’ll be doing steps 3-7 for the new unit. For teams, most of these steps should be done together.
Step 3: Know your curriculum & identify the standards and learning targets for each unit.
Of course, this is an entire process in itself. Again, you may have standards and/or learning targets designated by a state, district, or school-mandated curriculum. If not, you need to check off each standard to ensure it’s in one of your units. For classes I’ve taught for a long time, I often don’t spend time or conscious thought on this step, because I know my curriculum well, and I know all my standards are covered. But I still go back to the standards when I get stuck on questions of what to teach, how many examples to include, or how much time to spend on a topic.
Once you’ve got a list of standards or learning targets for the unit, divide up the days: How many days can you spend on each standard? This is the only way to make sure you cover everything and stick to your semester plan.
A major obstacle to efficient planning at this step is getting hung up on what to prioritize. In social studies, we have both content and skills standards to meet — we need to teach students the causes of World War I AND how to support an argument with evidence, for example. We often have a tension between these objectives, and it’s easy to get stuck on how much time to spend on content versus skills.
One approach to this obstacle is to address both content and skills through the same learning activities whenever possible. We can use a new topic (like the causes of World War I) to practice a skill (like supporting an argument with evidence). If you don’t have the content versus skills issue, it can still help you to think of ways to meet multiple standards with the same learning activities.
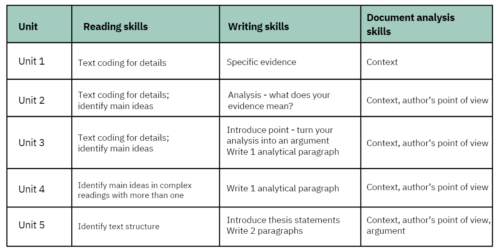
Another strategy is to make a plan for building skills throughout the year, unit by unit, in the same way content is designated by unit (see example below). Ultimately, the solution is to make, and then stick to, your days-per-unit plan, and then your days-per-standard plan. You only have so many days; all you can do is divide them up reasonably and make the most of the time you have.
Example of Global Studies skills progression
Step 4: Create a study guide based on learning targets.
Making a study guide involves taking your list of standards and/or learning targets from Step 3, and turning it into a student-friendly document. Earlier in my career, I didn’t always provide students with a study guide. When asked what would be on the test or assessment, I just said, “Everything.” My feeling was that I didn’t want to hold students’ hands too much. I wanted them to be independent in their learning, able to identify what was important to study.
However, I’ve changed to having study guides for all my classes, including my AP classes because I’ve found this better enables students to be truly independent in their learning. I give them the study guide at the beginning of each unit, so they can use it as a true guide to their learning throughout.
I encourage students to use it as a checklist, checking off terms and topics when we learn them, highlighting items they know they need to study more. Depending on the class, the study guide may or may not be an assignment students complete, but it is always the definitive guide to what will be assessed. If it’s not on the study guide, it’s not on the test, period.
This is the step where I start to differentiate for students with IEPs. Some students have accommodations stating they are responsible for a reduced percentage of all learning targets — for example, 75% of all learning targets.
I choose the 75% of learning targets that are most essential and create a version of the study guide with those learning targets highlighted. (I usually still include the other learning targets, so students know what I’m referencing in class. Students with reduced learning targets often learn that extra content anyway, so I still want to give them the chance to demonstrate that learning; they’re simply not held responsible for it if they don’t learn it.)
Creating the study guide helps me avoid another major obstacle to efficient planning — the urge to continue adding more examples, terms, connections, etc. to my teaching materials (in Step 8, the actual preparation of materials). When I teach about the effects of the Industrial Revolution, for example, I can find endless drawings, photos, and written primary sources to show the pollution, overcrowding, terrible working conditions, strict factory discipline, development of unions, development of new economic ideologies… endless.
Collecting all these examples not only uses up lots of planning time, but if I include them all in learning activities, I’m using up lots of learning time. Do students need to see every example I can find to understand the important concepts here? No, definitely not. Students can grasp the big ideas with 3 or 4 in-depth examples.
If I choose those examples now, by designating them on the study guide, I nip in the bud the danger of spending hours adding more examples than necessary later. There’s always more we could teach, but there’s only so much time.
Step 5: Plan the assessment.
This is a basic principle of backwards design – plan the assessment first, so you know what you’re working towards. I might not actually create the assessment (i.e., edit last year’s test or create the project directions and rubric) at this point, but I’ll have a clear, specific plan for what the assessment will be, and what modifications will be necessary for students with different learning needs. For example, will there need to be multiple versions of a test, or a simplified version of a project?
For teams, Steps 3-5 are essential to do together. With my Global Studies team, we work off a document we call the Unit Map. At the top is a spot to link the study guide and the document with standards for the unit. Next, we have a table laying out each day of the unit, with space for the learning targets, notes about learning activities, and links to all materials, including any modified versions for differentiation.
At the end is a place to link all parts and versions of the assessment, and a box for any team member to add reflections or suggestions for next year. This document is invaluable for keeping a large team coordinated and in touch with what we’re each doing, and for organizing our shared materials so we don’t duplicate work.
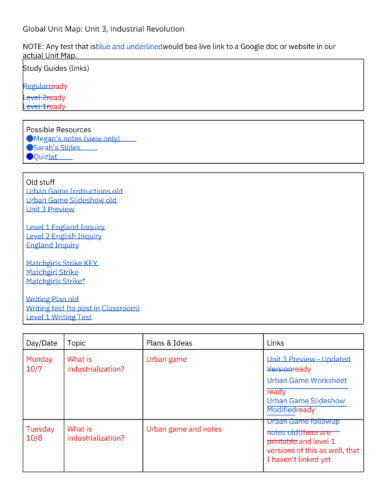
You can see more of the example unit map here. And get the template here.
Step 6: Collect learning activities.
I always start this step with what I did last year (or 3 years ago, if the last 2 years were a pandemic mess) unless I’m teaching a new class or a significantly changed curriculum, of course. For a unit that I’ve taught many times, that I know works well for student learning, I might mostly skip this step — I might go straight to plugging activities into daily lesson plans, Step 7.
If there’s some reason for a large change, such as new learning targets added to the unit, a significantly different number of days, an activity that didn’t go well last year, or a topic I know students still struggle to understand, I start with more of a brainstorming approach.
First, I list what I did last year, leaving out anything I know I want to replace. Then I look for new ideas from my trusted resources, from my colleagues, from teacher groups online. Or, if I’m desperate, from the whole wide internet. I only resort to a broad search if I’m desperate because it’s too easy to waste hours of time sifting through ideas online that range from high to very low quality.
From my brainstorming list, I match up learning activities to standards or learning targets to ensure I’ve covered everything. For some reason, though I do most of my planning on the computer using Google docs, I often find this step works best on paper.
This is when I do most of my planning for differentiation, and my overall approach to simplify this planning is Universal Design for Learning (UDL). The goal of UDL is to plan learning activities from the beginning that enable all students to have access to learning, rather than first planning for a mythical “typical” student and then modifying for multiple needs. This is a challenge if you haven’t been trained to plan this way, but it is a game-changer for student learning, for equity, and for efficient teacher planning.
When my school first shifted to full inclusion for all students, with no self-contained classes for special education or English learners, my colleagues and I found ourselves making 3, 4, or 5 different versions of assignments and assessments for various learners. This takes so much time. Instead, the idea of UDL is to make one version, a version that works for all or at least the vast majority of students without modifications.
There will still be students with significantly different needs who need a very different version or approach than the main one, but many of the changes I would make for students with learning disabilities, or English learners who have been in the country for a few years, can be part of the universal version.
I consider if the specific support I need to give a student is appropriate for all students; it often is. I also ask myself, what am I assuming students know or can do? I strive to stop making those assumptions and actually tell or teach students everything they need for the given activity. For example:
- If I’m going to play a video in class, I provide the written transcript to all students, not just English learners. I play the video, read through the transcript, and then play the video again, to ensure all students grasp the information.
- I post copies of my lecture slides, outlines and checklists for large assignments, and sentence starters for all students, not just students with these accommodations in their IEPs.
- I build in regular checks for understanding through the class period – checking with a classmate or group, checking with me; checking that students understand the directions or the concept.
- I make an opening slide for each class every day, which includes a list of the materials students need, a list of activities that day, homework, and learning targets. I used to only do this for my freshmen class; in my AP classes, I could generally rely on students following directions quickly. But this has changed since the pandemic. My current high school juniors have never had a full year of normal high school, so I realized early this year that I cannot assume they have the organization and executive function skills I would normally expect from juniors. So, why not make an opening slide for all classes? My older students appreciate the clarity as much as my freshmen do.
The main obstacle to efficient planning at this step is the desire to find the perfect activity, the perfect visual, the perfect video, the perfect technology tool for every topic, and to meet each individual students’ needs. The best advice I can give is to remember that perfect is the enemy of done. Find something that is good enough and move on. If you find yourself with extra time on your hands later, you can always come back to it and continue that exhaustive search for perfection on the internet.
For team planning, I recommend dividing this step up somewhat. Start together as a team, and decide which activities from last year to repeat, and which to change. Match activities up to learning targets and identify which need new activities. Then, divide that list up.
If there are 3 learning targets that need new or modified activities, it is dramatically more efficient for 3 individual people to work on each one, than to search and weigh multiple options as a group. Each person can come up with 1 or 2 options, then come back together to make the final decisions.
Step 7: Fill in daily lesson plans.
I know how many days I have for each learning target, and the activities I will use for each. It’s time to plug them into my daily lesson plans. I use a Google doc for my lesson plans because it can serve both as my planning document and the public lesson plans for students and parents. I don’t have to duplicate my work. My format is pretty detailed, both to help my planning and to help students be independent in catching up when they’ve missed class.
I use the setting “publish to the web” and post that link for students and parents; this setting turns the editable Google doc into a visually clean, non-editable webpage; it eliminates the normal Google docs frame and makes links live. Importantly, the published version does not display comments; those are only visible on my editable version. I use comments to make notes to myself about necessary prep and to communicate with co-teachers and my student aide in the lesson plan document.
![]()
I fill in the entire unit at a time — again, preferably before the unit starts. This is possible because I know exactly how many days I have for the unit, and how many days I have for each learning target. Planning the entire unit at a time also helps me realistically consider the amount of work I’m giving students and the amount of grading I’ll have.
At the end of this step, the entire unit is planned – I know exactly what I’ll be doing each day – but not prepped — I haven’t actually created, edited, copied, or posted the materials I need.
An obstacle to efficient planning at this step is the need to adjust for a specific group of students or when something doesn’t go as planned. Some teachers hesitate to plan “too far” ahead, believing they’ll have to change everything anyway. I definitely empathize with that and have often had to adjust my lesson plans when activities take too long or students struggle with a concept. I still find it easier to make those adjustments because I have the entire unit planned already.
I know how much extra time I can afford to take on a concept. I know which activity later in the unit could be cut or made shorter. I know whether or not I’m getting my future self into trouble with time by spending more time on something now. Without advanced planning, any adjustments would certainly get me off track from being able to finish my curriculum.
I’ve learned some lessons about planning from the last two years of hybrid and virtual teaching. In fall 2020, my school did hybrid learning where students were in school 2 days a week; we had one virtual day a week with all our students; and students worked asynchronously the other 2 days. I only saw students in person 2 days a week, which forced me to really prioritize what needed to be done in person.
Those priorities were always the most interactive activities. Though this year I get to see students 5 days a week, I’m still using this lens of prioritizing interaction in class time, including discussion, debate, small group work, and conferencing. These activities have the biggest learning and development impact for the limited minutes we have.
The 2-days-a-week hybrid schedule also helped me tackle a huge obstacle to efficient planning, which is overplanning. I had to narrow my learning activities down to 2 days only – and applying that lens to teaching now keeps me from overplanning.
I ask myself, if I had to teach this entire topic in only 2 days, what would be the best use of that time? Everything else is less essential and can be cut back. I plug that 2 days worth into my lesson plans, and only add 1 or 2 of the other activities. This helps me leave some cushion time for when things take longer than planned.
For team planning, I suggest doing a broad outline of the daily plans as a group, but then fine-tuning them individually. It’s not realistic to expect a team of multiple teachers to do exactly the same thing every day; it’s not worth the time or energy.
If the whole team has agreed on the timeline for the unit, the standards and learning targets, the study guide, and the assessment, it’s time to allow for individual preferences, creativity, experimentation, and last-minute adaptation for specific classes or students.
Step 8: Prep your materials.
Now I actually create documents for assignments and assessments, edit existing documents, post activities to Google Classroom, and make copies. If you’re a member of the 40 Hour Teacher Workweek Club, you’re familiar with the concept of the Main Thing — the one thing you need to get done each day that will give you the most satisfaction or move you forward the most.
My Main Thing every Friday is to prep for Monday; I don’t leave school on Friday until all materials for Monday are ready, copied, and posted (unless something went wrong in class on Friday and I have to ponder how to adjust).
I could show up two minutes before class on Monday and be ready to teach. My Main Thing on Monday is to prep the rest of the week. Sometimes this bleeds into Tuesday, but it’s generally pretty efficient because I’ve already made the decisions about what to do when. I might make adjustments while prepping, but not major overhauls – that happens in Steps 6-7. This schedule leaves my Tuesday, Wednesday, and Thursday mostly open for grading, collaboration, working with students, planning a new unit, parent communication, adjusting, etc.
I do some more differentiation at this step, if there are materials that need to be changed for specific students. If I’ve done good universal planning, however, I should have a minimum of that.
An obstacle to efficient use of my prep time that I’ve struggled with is the urge to constantly recheck that I’m ready for class. Even if I’ve prepped everything on Monday, I still want to spend 20 minutes going over my plan on Tuesday morning – which is 20 minutes I could spend on something else important.
I use technology to help curb this urge to waste my time. In my lesson plan document, when I look at the next week on Friday, I make comments on everything that needs to be done. I’ll comment “edit and post” on an activity I’ll post in Google Classroom; “make copies” on a test; “find primary source” on an assignment, etc.
These comments constitute my planning to-do list. When I’ve done the task, I resolve the comment; once I’ve resolved all the comments, I know I’m ready. So the next day when I’m tempted to waste time checking, I can see at a glance that there are no comments, which means I am definitely ready for class.
Another technology tool that helps me curb my rechecking is the Chrome extension TabCloud (there are many other tab managers as well). With TabCloud, I create a window with all the items I need to teach a specific class that week — the Google slideshow, the documents, the websites, the videos, etc. Then I can save that window with a name like “Psych Unit 3,” and when it’s time to teach that class, open ALL the tabs with a single click.
This not only helps me switch between the multiple classes I teach throughout the day without having 50 tabs open all the time; it also cuts down on my rechecking because I know I have everything I need saved in one place.
For team planning, I urge you to divide this step up as much as possible. To the extent that you’re using the same activities, assignments, study guides, and assessments, you only need one person to make each of those items. Don’t duplicate work. Especially divide up the work of making modified versions for differentiation.
You might have to let go of personal preferences like fonts, colors, and formatting, or even the way you would phrase the directions, but that is worth it to leave at the end of the day without extra prep to do!
Step 9: Reflect and keep notes for next year.
Finally, you can do your future self a huge favor by keeping organized notes on how your lessons went. Especially if you’re an overplanner, note how long activities took (whether in minutes or class periods), so you can be more realistic next time.
Take note of what students misunderstood, what directions weren’t clear or needed too much clarification. I do this by leaving comments in my lesson plan document, because each year I make a copy of it to save, and keep editing the same document, or by leaving comments in the documents for the activities themselves. Every year when I find these notes to myself, I’m happy to have a clear idea of how to improve on what I did the year before.
The Truth for Teachers Podcast
Our bi-weekly podcast has received over 1,200 five star ratings + 9 million downloads. You can support our work by subscribing in your favorite podcast app for free!
Explore all podcast episodes


Megan Faherty
High School History/Social Studies
Sign up to get new Truth for Teachers articles in your inbox
Discussion
Leave a Reply


OR

Join our
community
of educators
Share ideas or get advice via our social channels.


Megan, I listened to the podcast and then had to read this article. I, too, am a 40HTWW grad and I’m always looking for ways to streamline.
I was wondering if you would feel comfortable sharing a screen shot of a student study guide. It’s the only thing you didn’t include. I teach middle school ELA, so their needs will be different, obviously. Otherwise, thank you so much for sharing this article so ma t specific and actionable ideas!!
I am curious about the same thing as Rebecca! I love the idea of the student-facing study guide and I’d love to see an example. Thanks for the really useful step-by-step process, Megan!
Hi Megan,
I am a lead teacher needing ideas relating to lesson/unit planning. I love the video you shared detailing the nine steps of lesson planning. Please send any information you feel will be most helpful in working with my new teachers. I too, would love to see a copy of your study guide for students.
Thanks!
Ms. Watkins:)
Thank you for sharing your lesson planning process! It’s always interesting to see how different teachers approach their preparation, and your insights are incredibly helpful. I especially loved your tips on flexibility and adjusting plans based on student needs. Keep up the great work!
I loved getting a glimpse into your lesson planning process! It’s inspiring to see how you incorporate creativity and structure to engage your students. Your tips on organizing resources are especially helpful—thank you for sharing your insights!
I loved this deep dive into your lesson planning process! It’s so refreshing to see a real teacher’s perspective on the challenges and joys of planning. Your tips on balancing creativity and curriculum requirements are especially insightful. Thanks for sharing your journey with us!
I love how you broke down your lesson planning process! It’s so helpful to see real examples of how you organize and implement your ideas. Your tips on aligning objectives with student engagement are especially valuable. Thanks for sharing your insights!
Thank you for sharing this insightful look into your lesson planning process! I love how you emphasize the importance of flexibility and adaptability in teaching. It’s inspiring to see the thought and care that goes into creating engaging lessons for students. Your tips will definitely help me refine my own planning approach!
I really enjoyed reading about your lesson planning process! It’s fascinating to see how you integrate flexibility and creativity into your plans. Your tips on adapting lessons for different learning styles are incredibly helpful. Thanks for sharing!
I really appreciated this behind-the-scenes look at your lesson planning process! It’s inspiring to see how much thought and effort goes into creating engaging lessons for students. Your tips on balancing curriculum requirements with creativity are particularly helpful. Thanks for sharing!
Thanks for sharing your lesson planning process! It’s incredibly helpful to see how you break down your ideas and incorporate student needs. I especially loved the tips on balancing creativity with curriculum requirements. Looking forward to trying some of these strategies in my own planning!
Thank you for sharing your insight into your lesson planning process! It’s really helpful to see the practical steps you take and the tools you use. I especially resonated with how you prioritize student engagement—it’s a reminder of why we’re all in this field. Looking forward to more tips and strategies!
Thank you for sharing your insight into your lesson planning process! It’s always inspiring to see how individual teachers approach their craft. The tips on incorporating student feedback and reflecting on past lessons were particularly helpful. I can’t wait to apply some of these strategies in my own planning!
I loved this behind-the-scenes look at your lesson planning process! It’s so helpful to see the thought that goes into creating engaging lessons. Your tips on balancing curriculum goals with student interests were especially enlightening. Thanks for sharing your insights!