


Education Trends, Teaching Tips & Tricks | Sep 30, 2015
Curious about classroom Makerspaces? Here’s how to get started.

By Angela Watson
Founder and Writer
Curious about classroom Makerspaces? Here’s how to get started.
By Angela Watson
Makerspace is a rapidly growing trend in schools across the country, but to be honest, I’ve never implemented one myself, and I can’t quite picture the logistics of orchestrating a Makerspace. How do kids know what to do? How can you find out what they’re learning? How do you make time for that with all the other tasks crammed into the school day? And how do you keep the Makerspace from turning into a chaotic mess?

I wanted to get answers to these questions from teachers who have extensive Makerspace experience, and not just at the secondary level. So, I invited Cheryl Nelson and Wendy Goldfein of Get Caught Engineering to share how they’ve managed Makerspaces in their own classrooms and helped other elementary and middle school teachers get started, too. Thank you, Cheryl and Wendy, for sharing your experiences below!
What exactly is a Maker and what happens in the “space”?
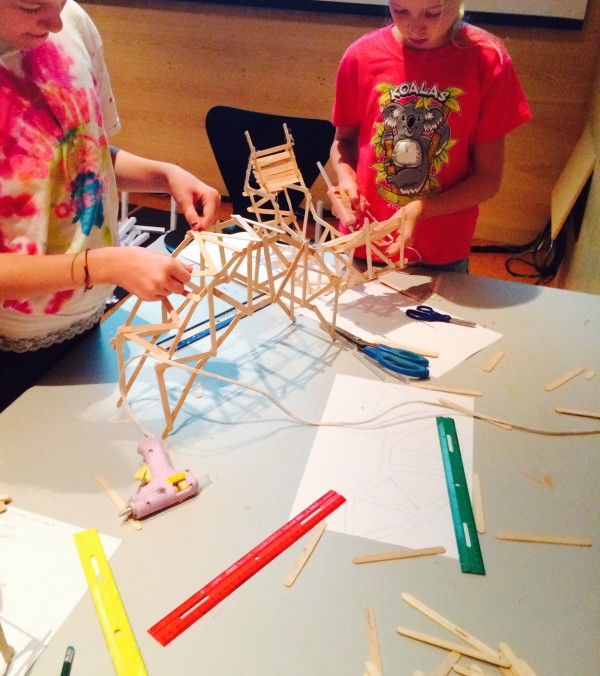
If you search a thesaurus for the word “make” you will find a plethora of great synonyms: create, cause, assemble, manufacture, achieve, invent, generate, produce, craft, build, construct, or generate. And that is exactly what happens in a Makerspace. It is truly an environment where one is only limited by one’s imagination. It mixes all aspects of STEM–Science, Technology, Engineering, and Math–and sprinkles it with imagination for an exploration of “what if.”
As we have integrated engineering lessons into our classrooms, we have watched as kids come up to us and asked, “Mrs. G, are there extra popsicles sticks? May I have them?” “Mrs. N, can I have this extra wire? Do you have any extra magnetic tape?”And when asked, ”Why do you want these items?” the answer invariably was “I just would like to build something with it.” The desire to gather “stuff“ in order to “create things” became commonplace with our students.
With those experiences in mind, we started paying more attention to the Maker Movement and came to the conclusion that having a Maker Space in our classroom would be a perfect catalyst for developing problem solving skills with our students.
What materials do you use in a classroom Makerspace?
Although it would be really neat to have some of the more expensive tools that many Maker Spaces have, like 3-D printers and Little Bits Electrical Kits, we settled on creating a space that used simple items found around the house, classroom, and school, including recyclables and throw-a-ways.
Rather than have students just gather up a lot of materials to glue or tape together, we developed task cards that would provide brain push-ups and explore possible projects that interested them. Students chose something that interested them to work on. They were then allowed to draw a picture of what they imagined, build a prototype for their idea, or actually create and make a finished project.
The projects were widely varied: crocheting a hat for a cat; constructing a desk organizer; making a mock-up of a state-of-the-art lunch tray, and an alarm for treasure box. Some students wanted to create and some wanted to investigate. Taking apart old donated cell phones or toys was popular. All choices provided the students with problem solving opportunities.
How do students know what to build in the Makerspace?
As we developed our Makerspace center, we quickly realized that Makerspaces and children are a natural combination. Children are tinkerers. They enjoy taking things apart to see how they work and being challenged to put it back together. By providing an array of materials, they can create something unique that has never been seen before.
In a classroom Makerspace, students have the freedom to explore their own interests and to come up with their own projects that they would like to create. Given this freedom, students direct their own learning by delving into topics that they need to learn about to make their project successful:
Want to build an alarm? Time to review circuits and switches.
Want to create a small hat? Time to learn to sew or crochet.
It becomes a real-world inspired motivation to learn more and delve into research or track down primary source interviews from those “in the know.”
How do I find the time for students to use a Makerspace?
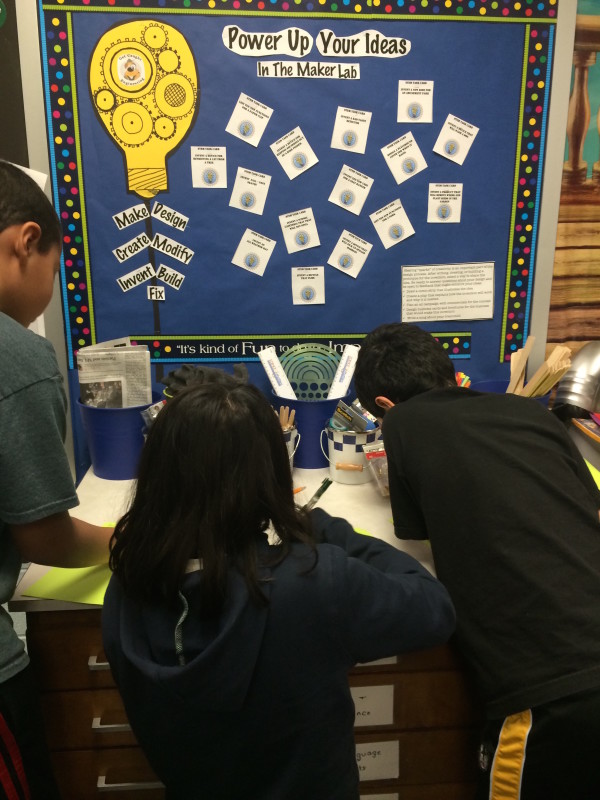
We decided to keep things very simple in our classrooms and create a Maker’s Space as a center. Students could pursue interests and begin a project of their own choosing. For those needing inspiration, these task cards with suggestions were provided.
The Maker Space is essentially open all day for students to continue their projects when regular classwork is completed. The Space is particularly busy on days when outdoor recess is impossible.
What do I need to get started with a Makerspace?
Beginning a Maker’s space doesn’t mean that you need to max out your or the school’s credit card buying tons of materials. To begin with, stock the space with items that are typically found around the house or school – small and larger boxes, paper towel and toilet paper tubes, egg cartons, masking and duct tape, as well as liquid and stick glue.
Ask for donations from parents for other items such as wire, yarn, toothpicks, cups, recycled plastic containers. We have found that the best type of cardboard for ease of cutting are cereal boxes. Tools needed will include screw drivers (flat head and Philips head), pliers, and scissors. You may need to purchase items such as feathers, pipe cleaners, brads, and craft sticks, but don’t hesitate to add those items to a donation request from businesses or parents.
If possible, try to include old toys or small electronics to be taken apart or help kids discover how things work. Broken toys can also be supplied for students to repair, furthering their knowledge of how things work.
How can I make sure students are learning and not just wasting supplies?
Good questions. Yes, thinking can be untidy, tinkering can generate clutter, and testing ideas can create a muddle. You do not want your Maker Space to just become a “Let’s Make A Mess and Walk Away” Center. Planning ahead on your part and their part will alleviate headaches later.
To help control the consumption of supplies, we strongly suggest that students first create a detailed plan for their project. By having a detailed, labeled drawing and a list of projected materials provided to the teacher, wasted materials are reduced. This also ensures that the student has carefully thought out, researched, and planned the project.
How do I start a Makerspace in my classroom?
Ready to give it a try? Here’s your Makerspace to-do list:
- Select an area for your Makerspace. You want room for 3-4 students to work, and a display area for project ideas and a sturdy table.
- Gather storage containers.We love to shop at hardware stores for ideas. (Did you know you can buy empty paint cans? Those are marvelous for storing various tools.) We also shop at the dollar store for assorted bins and baskets that are reasonably priced. Think carefully about where you will store extra supplies. There is nothing quite as exciting as receiving five huge trash bags of recycled items at 8:00 AM and having nowhere to put them except behind, in front, and on top of your desk!
And that reminds us…become VERY good friends with all of the custodians. They are the experts at helping you find locations to store extra items, as well as making sure that your “treasures that look like trash” don’t get tossed out. (We know the favorite type of homemade cookies for every one on our custodial staff…just sayin’.)
- Send out a donation letter for items you would like. Letters can not only go to parents and grandparents, but stores and associations and agencies, too. Really search your community for possible connections. We developed no fear in approaching anyone and everyone for items. (Did we mention the 1,000 ping pong balls, wooden spools and paint stirrers that a group donated and DELIVERED to us? Three years later, we are still making catapults with that amazing donation.) Here’s a suggested donation list of STEM essentials.
- Put donations away as soon as they come in. No excuses. Really. Trust us. We know two words: organized chaos!
- Create a poster with rules for your center. Keep it simple. We suggest: “Plan. Persevere. Put Away.” Hint: Make keeping the Makerspace organized one of your classroom jobs.
- Create an Open and Closed sign as well as a sign up sheet for the Makerspace.
- Hang an inventory list nearby so that the students can indicate when certain consumables are beginning to run low.
- If possible, solicit adult volunteers to be the docents for the Makerspace. This will make your life easier, but is not necessary for a successful Maker Space.
- Make a wish list for big items such as a 3-D printer or Makey-Makey kit and keep your eyes out for small grants that can help you obtain those items. Have a “nothing ventured, nothing gained” attitude and don’t be afraid to give grants a try for things you would like to add. We regularly post small grant opportunities that are easy to write on our Get Caught Engineering Facebook page.
What Makerspace resources do you recommend?
Need inspiration and back up support for your plans? The Maker Movement has inspired lots of reference books to help justify the concept, design a space, and plan activities. Our favorites include:
The Art of Tinkering by Karen Wilkinson and Mike Petrich
Tinkering: Kids Learn by Making Stuff by Curt Gabrielson
Making Makers: Kids Tools and the Future of Innovation by AnnMarie Thomas
Making is Connecting by David Gauntlett
The Invent to Learn Guide to Fun by Josh Burker
In the mood to browse? Head to our Get Caught Engineering’s Makers Space Pinterest Board.
It is our hope that Makerspaces become as central to a classroom as a reading corner or a math manipulative shelf. Flexible thinking, problem solving, collaboration are all 21st century habits that a Makerspace can provide for you and your students. Providing an environment where students can create and dream of new ideas is the best way to instill those skills. And besides, as the famous creator and ultimate maker Walt Disney once said, “It’s kind of fun to do the impossible!”
Together, Cheryl Nelson and Wendy Goldfein of Get Caught Engineering bring a total of 50 years of teaching experience in Kindergarten through seventh grade. They have taught gifted and special needs students as well as English Language Learners. Wendy and Cheryl have developed an integrated engineering curriculum encompassing grades K-7. Their blog and website provides free STEM resources and support ideas. Follow their Facebook and Pinterest pages for updates on grants, curriculum, and professional development opportunities.
Questions for Cheryl and Wendy? Want to share your experiences or resources for Makerspaces? Please join the conversation in the comments below!
Angela Watson
Founder and Writer
Sign up to get new Truth for Teachers articles in your inbox
Discussion
OR

Join our
community
of educators
Share ideas or get advice via our social channels.


Thank you for sharing this article.
Hello,
Thank you for an organized way to “think through” the Makerspace concept. I am excited to be in the process of creating a Makerspace area for our elementary school of 750 students so your ‘organized chaos’ expression is very much appreciated! Thank you for your practical direction! Love your ideas!
Sheila Fox
Edgerton, WI
So glad this was helpful! All the best to you and your students.
I’m really interested to practice this idea with my students. I’m a EFL teacher here in Ecuador, I need new ideas for my students here. Thank you so much.
in fact i have question which is about how to manage the inventory of the maker-space?
which program or software are usually used to manage the inventory of the all item?
Our district libraries are starting this movement in a the libraries. So glad to see that I have used some of your suggestions even before reading this article. Thanks for all the information, suggestions, ideas and guidance.
Thank you so much. Starting a Makerspace and seeking out best practices. Great resource!
I can see this in a self-contained K-6, but what hints do you have for my 7th grade Life Science classes of 5 periods? I do have a 3D printer any suggestions???
We agree that maker spaces in a middle school classroom are a logistical challenge due to the limited time and the number of students. We have noticed that most middle school maker spaces are located in the school’s library. Students have access to the lab and materials before school, lunch, during advisory, and after school. There is huge push nationally for libraries to include maker spaces. We are seeing lots of articles in library journals and websites. At our elementary school we not only had a maker space in the classroom this past year, but also added a Tinkering Lab in the school’s library that all grades k-6 had access to on a rotating schedule. (We have a picture of our Tinkering Lab on our Instagram site) A fantastic middle school resource is Diana Rendina’s Renovated Learning.com. She has lots of ideas for creating dynamic learning spaces at the middle school level. Hope this helps. Wendy and Cheryl GetCaughtEngineering.com
This is a great article. Thank you! Would you be willing to share your task cards? Thanks!
Hi Jen,
We have three packets of task cards available. There is a link to them in the article. Thanks for asking.
Wendy and Cheryl
I can’t find this link.
How have you tackled the task of teachers signing out materials from the Makerspace?
Thanks for any advice!
Can I get a copy of the ideas you put on project cards?
This website is amazing!!!!!!!!!!!!!!!!!!!!!!1 I have a makerspace in my school river oaks and it is amazing we got the ideas from this website :))))
Great explanations, many thanks. I’m now researching how a maker-space can be used for the purpose of helping kids learn and improve their English Language in Nigeria. I’m thinking of a creative way to get out-of-school kids (especially the never been to school, aged 5-12 years) making so as to learn English words, apply them, and build their communication and collaboration skills (from the 4 Cs) in the process. I understand maker-spaces are used for STEM however I think it can be designed around other subjects like Learning English. My NGO helps kids learn using Edu-tech (encf.org.ng) and I’ll appreciate any ideas or resources on the above research. Many Thanks.
Thank you for these ideas! Can you tell me where you’ve gone or what sorts of organizations or companies you’ve solicited for donations of materials?
Love this
Good Morning,
I was wondering if you had any information on developing a Makerspace specifically for younger students (K-1)?