


Classroom Management, Podcast Articles | May 12, 2024
5 ways to make an old lesson feel fresh and interesting again

By Angela Watson
Founder and Writer
5 ways to make an old lesson feel fresh and interesting again
By Angela Watson
Bored with your curriculum or instructional routines?
Often we switch things up in our teaching to keep ourselves from getting bored. But, too much change can create unnecessary work for us. It can also waste class time for students as they spend more energy on figuring out how to complete an assignment than on practicing the skills we want them to learn.
So, I’m talking with Betsy Potash of Spark Creativity about easy ways to make things feel fresh and interesting again.

Betsy’s identified five open-ended activities that you can add to your rotation of go-to strategies, and incorporate them in unique ways throughout the year. We’re talking about how to use the following in grade 2-12 classrooms:
- podcasts
- stations
- hexagonal thinking
- escape room design
- one-pagers
Betsy will definitely spark your creativity as you listen to these easy-to-understand activities which you can plug into the lessons you’re least excited to teach. These ideas will get students actively engaged in learning and boost your energy and enthusiasm as a teacher.

Listen to episode 301 below,
or subscribe in your podcast app
Sponsored by Erikson Institute and Understood Explains
Easy strategies to revive your lessons
ANGELA: So we’re going to discuss how to make old lessons feel fresh and interesting again. And I can’t think of a better person to talk about that with because you are so creative. You have so many wonderful ideas, and you just prioritize creativity. It’s just something that is infused in all of your work, and I find that so energizing and inspiring. I want to do this for the teachers who have taught the same lesson multiple times, either over the years or else they feel like they’re teaching it to multiple class periods and they’re just sort of getting bored with it.
Or maybe they’ve taught the same topic the same way every single time and they just want something different. So you’re going to share a couple of different ways for us. Can you give us a quick overview of each of the five options that you’re going to talk about today? And then we’ll go through deeper on each one.
BESTY: That sounds great. You know, I have to admit that I sat down to do this and I tried to come up with three — my three favorite creative makeover lessons. And I wrote them all down, and then I was rollerblading and I thought of some more. And I was in the car, and I thought of some more. And I was washing my hair, and I thought of some more. And I was like, Angela, I cannot do three. Can we at least do five? So we’re going to do five today, and I’m excited about them all.
So just in brief, we’re going to be talking about how you might cover material, whether it’s for review, introducing new material, doing a discussion, or some kind of summative assessment, and you want to create a new spin on it. I’m just going to quickly hit on them. So you might have your students create podcasts about the content in your class. This is a strategy that I absolutely love. It’s super flexible. You can use it for so many things. We’ll jump into that. You might take your lesson as it stands and break it down into stations. Stations are such a flexible strategy that can be used in so many fun ways. We’re going to talk about that.You might try my absolute favorite unique take on discussion, which is called hexagonal thinking. And don’t worry. I will explain what that is when we get to it.
You might take a unique approach to the escape room trend and have your students design escape rooms. That’s number four. And then finally, this is maybe my favorite go-to of all time. You might help students review material or synthesize across kind of multiple sources and create a one-pager of the information that you want them to learn or review in class. So those are the five in a super fast-forward version.
#1) Podcasting with students
Let’s dive in with that very first one, podcasting with students.
So this is a real favorite for me. I’ve designed, like, eight different types of student podcasting projects. And I think for students who have grown up in this world of audio and visual, it’s actually much less intimidating than it can be for us as teachers.
When I assigned my first podcasting project, I had no idea how to podcast. I didn’t own a microphone. The only time I used my headphones was on a run, and I didn’t know what I was doing. But quickly, my students figured it out and they had no problems with the tech. And since then, I’ve realized it’s really not about having the perfect sound mixer or the perfect music. All you need is this simple website called Vocaroo that has a big red record button. And you have students press record, and it records the podcast. And once you know that the tech isn’t going to be an issue, there’s just so many ways to have students create a podcast around the content for your class.
Let’s say, for example, that you’re a Spanish teacher and last year in your Spanish class, you wanted to cover five different Spanish artists. And so every Monday throughout your five-week unit, you gave a PowerPoint about these Spanish artists. Right? You wanted to convey the information to your students. You made a nice PowerPoint, but you found that it was hard to capture their attention. Another way to cover the same material would be to turn these artists over to your students and say, “Hey, let’s get into groups. I’m going to give each group an artist, and I want you to create a 90-second podcast in Spanish about your artist using these verbs we’ve been working on that relate to art.” And then you’re going to give them time in class. They’re going to come up with a little hook for their show. Maybe they’re going to add in some fun music that reminds them of their artist. They’re going to hit the facts, in Spanish.
And they’re just going to be practicing all these different skills at the same time that they’re conveying the exact same information that you would have conveyed in your PowerPoint back to the class. And then at the end, you get the links for all these podcasts. You can either play them in class or you can design a choice board of the podcast and let students just decide which artists they want to learn about.
There are just so many ways that you can put your own spin on this depending what discipline you’re in, where you take the content that you would have needed to present to kids and you turn them into the teachers, to present back to each other. And it’s just that they learn about it on a deeper level. They get to integrate this technology that they find interesting and relevant, and they get to participate in a genre that’s very real-world. Right? I mean, there are hundreds of thousands of podcasts. There are professional podcasters out there. Obviously, you and I are both podcasters, so I don’t have to talk you into the fact that it’s a career path. But, my experience over and over has been that this is really interesting for students. And so it’s just a fun way to create a twist on any basic presentation in class.
What I like about it is you said 90 seconds. Right?
Yeah. It can be super quick or, of course, it can be long. It’s up to you.
I think I like the idea of a really short one. That is cool because so often when students are asked to share information with the class and it includes writing or some sort of visual presentation, like they’re making a video or a slideshow in Canva or whatever. And for a lot of kids, that’s intimidating. That takes a lot longer just focusing on the audio. I mean, the great thing about audio podcast is that you’re really focusing just on the words. It’s just it’s the content of it that I think is so very powerful.
Yeah. And you can start with keeping it simple. A 90 second audio helps students get comfortable. Then maybe later, you want to do a longer project. You’re going to have them create a companion visual cover like they would see in a podcast player app or you’re going to have them create the show notes like if they were a blogger or they were a business that was producing a podcast. You can decide how complex you want to get with it. But it’s just this really neat genre that you can tap into as long as you don’t feel that sense of fear around the tech.

Can you tell us about the tool that you use and what that’s like on the back end for teachers in terms of being able to collect all of the podcasts and share them?
Yeah. Absolutely. So it’s really an extremely straightforward process. If you go into Chrome and you type in Vocaroo, you’ll get to this website called vocaroo.com. And it literally just says, click the big red button to record. And there’s a big red button in the middle of the screen. And so your student will have their script, their music, whatever they want to put on their podcast in front of them. They will click that red button and record their 90-second podcast or whatever. And then there’s a stop button. They’ll click the stop button. And then there’s a line that says, do you want to download your audio file? And they’ll click that and they’ll have the audio file.
What I think is the easiest as the next step is just to upload it to their Google Drive and to change the sharing settings to public. So just like if they were sharing a doc with you or a slide presentation, they can change it to public so that you can then listen to it, the class can listen to it. Or you can do, like, the permissions to the class, however you have it set up in your classroom. And then you’ll just have a link to it. And you can you can create a linked list of the class podcasts for everyone to experience. Or you can just play them out loud in class. Or you can just collect them and grade them if that’s the type of project that you are doing.
Learn about student podcasting in a free PD series
#2) Energizing your classroom with stations
Let’s move into our next idea for making an old lesson feel fresh and interesting and that is stations. Stations are one of my favorites so I’m really excited about this.
Well, I love station,s too. I feel like virtually any lesson can become stations, and that’s one of my favorite things about it. So let’s quickly talk about how you can set up successful stations. I think there are a few components that you want to hit.
Number one, when students come in, you want to have some expectations up on a slide on the board for what station time is going to feel like, about how long are they going to spend at a station. Are they allowed to talk as much as they want? Are they supposed to be whispering? Is there a certain, access path for getting help with the teacher? That kind of thing. Just a few basic expectations.
Then around the room, you’re going to have pulled your desks or tables into these kind of little areas, and you’re going to want some kind of label. Station 1 is this. Station 2 is this. Station 3 is this. And then you just set up the types of activities that you want them to do at each station. So for example, maybe you’re an English teacher like me, and you’re giving a bunch of information on a literary movement. And in the past, you’ve done it as a lecture, but you feel like you’re ready to give it a glow-up. Right? So you’re you’re going to turn it into stations.
So instead of lecturing about these different things, you’re going to have different areas around the room, where students are going to be taking information but also, maybe trying some creative work of their own, maybe having a discussion with a partner, maybe participating in, like, a silent discussion where they have a chance to do some writing and responding to other people’s writing. So as you build your stations, you want to think about, Okay, what do I want the student to do in this little section of the room? What kind of models can I put out to help them see what success would look like here? What kind of resources can I put out to make it easier for them? And then it’s just kind of fun.
You’re like, Okay, I want them to watch this amazing four-minute video that I found about the literary movement at this station and then answer these questions with a partner. When they get over to this station, they’re actually going to put on headphones and listen to this interview with a historian on a podcast that I found. And then they’re going to choose their favorite quote from the historian and add it to our graffiti wall. Then they’re going to go over here, and, they’re going to look at a piece of writing from this literary movement, and then they’re going to copy it. They’re going to use it as a mentor text to do a very similar piece of writing.
And so at the end of sort of their experience with these stations, they will have been introduced to the literary movement through different types of genres, through creative work, through discussion. And they will have gotten the same information that they would have gotten through the lecture. But they get to get up. They get to move around. They get to be social if they want to be. They get to go at their own pace. They have some choice. Maybe they don’t have to hit every station. They hit the stations that they’re most interested in. And you are free to go in and help. You can either create a station where you’re really there hands-on if it’s a difficult task or you can roam and you can help the kids who need you, which is just such a benefit to creative stations, the freedom that it gives you as the teacher to just be part of the action.
How do you manage the system where students can choose their stations and they don’t necessarily have to go to all of them? What does that look like so it doesn’t feel chaotic?
So in that case, you’d really want to be clear with your expectations upfront. Say you have five stations. Maybe you want to say, you know, you need to get to at least three stations, during this class period. So that means you’d be at each station for about 10 minutes. If you go faster than that, feel free to go to all five. Or you need to hit every station before the end of the class. You’re going to need to have filled in all five sections on the handout that I’m giving you now that sort of is your takeaway from each station. It’s up to you. It depends on how you split up the information.
If you feel like they need everything at all the stations, then you may want to do something a little bit more like, “I’m going to sort of ding this sound effect on my computer every eight minutes, and that’s going to be your cue to stand up and pick another station.” If you want to just really give them freedom and you feel like there’s plenty of time, you can say, “I want you to go to three stations. It’s about 10 minutes. You know, manage your own time, but I’ll give you reminders if I feel like no one is moving” kind of thing.
What would you say to a teacher who thinks, “I love stations. They work pretty well in my classroom, but I have trouble coming up with ideas of knowing what to do in the stations.”
Well, I think one of the most helpful things to think about is going back to the principles of universal design for learning and thinking about different ways that students can approach the information. So think about your student who loves learning through visuals. How could you incorporate a photo essay or a video or some kind of manipulative at this station that will allow that student to see this information? And think about your student who just loves print and wants to dive deep into words and think about what vocabulary you can provide, what kind of interesting nonfiction complements the text. Or what kind of articles, short stories?
And then think about the student who really learns by hearing. Could you incorporate music? Could you incorporate a podcast or, the audio from a documentary? And just think about different angles on what you’re wanting to teach. And you’re going to be able to let this multimedia do some of that work for you, which is actually going to save you time. There are so many incredible resources out there. It’s more about curating them and less about you needing to be a fountain of all the information.
#3) Hexagonal thinking: engaging students with multidimensional connections
What’s the next idea for making an old lesson feel fresh and interesting?
This one is my most visually complicated, but it’s also one of my favorite, and it’s called hexagonal thinking. So think way back to math. Think about a hexagon. A hexagon is a shape that has six sides.
So if you imagine a little paper hexagon, a little six-sided hexagon, and imagine that it has some kind of key idea on it from your unit. Let’s say you’re a science teacher and you’re teaching about global warming. When you put in the middle of that hexagon, “carbon emissions”. Now as you create more of these hexagons, you’re going to be thinking about key ideas from your unit that you want students to connect.

You’re going to create a deck of hexagons with all of these different key ideas. So terminology from your unit, maybe quotations from your unit, could even be like types of equations from your unit. And then you’re going to think about other ideas from other disciplines, ideas from the modern world, news stories, public figures, anything that can connect with your unit that you think would be sort of fascinating fodder of conversation for students around this topic. And you’re going to create this little kind of paper pile of hexagons with your different terms. And then what you’re going to say to students is, “In your small group, spread out all these different little pieces of paper with all their different little words on them. And I want you to think about how you can connect them, laying them down on your table. How can you connect carbon emissions with polar bears, with, you know, rising seas, with political tensions, with just all these different things.”

And they need to decide which hexagon combines best with which other. And if they have, say, 15 of them, each one just has 6 little sides. Right? So they’re going to start to discuss, “Oh, no. This one would fit better over here. This connects more to this other thing. This little card needs to connect here to this central idea.” Someone else in the group is going to be like, “No. No. No. We need to move that over to here, and here’s why”. And what’s really fascinating about hexagonal thinking is the conversations that ensue because there’s no one right answer to how to connect all the main ideas of your unit with key connected modern events.
It’s all about how students can make those connections themselves and then argue for the validity of their claim. And I just hear from teacher after teacher after teacher, and I’ve shared my free toolkit for this with maybe 15,000 teachers, that they hear discussions unlike anything they’ve ever heard before when their students sit down with these. There’s something about the physicality of it that just ignites these conversations. And people become die-hard defenders of what they believe should connect and what they believe should not connect. And it’s just this really fascinating experience.

So I’ll link to your free toolkit because that’s going to help teachers with the logistics of it. Tell us about how that works. So you’re you’re printing out the the class set of cards. Right?
So in the toolkit, you’ll see many models. You’ll see examples for how you can show students how to defend a connection. You’ll see a bunch of templates where you can just type in your terms and then print them out. You can either do this digitally or you can do it with paper. But it’s super quick in Slides, just to type in the terms you want to try out and then hit print. And now have your students help you cut them out. This is the number one question, “Okay, Betsy. Now I have 500 tiny little paper hexagons and a scissors. I don’t want to spend the next 4 hours doing this.” Yeah. Just bring the sets of hexagons to your groups and have them cut them out, and then it will be much easier for you.
Free Digital Toolkit for Hexagonal Thinking
Video: Using hexagons to build critical thinking skills
#4) Make learning immersive and collaborative with escape room design
Your next tip is escape room design.
So escape rooms are undeniably one of the most engaging teaching strategies out there. But I have had the experience that maybe many listeners have had that it takes, like, 10 hours to create an escape room from scratch. It is exhausting. If you have an entire PD that you can devote to creating an escape room, fantastic. But if not, you know, you may never have 10 hours free to design your Spanish subjunctive escape room or your World War 2 escape room or whatever. And so what I’ve come up with as an idea is to create a digital toolkit that’s editable, which, again, I’ve already created for you as a free resource.
And then and then let your students customize it to create their own escape rooms. It once again puts them in the driver’s seat as the kind of the teacher. You can break up almost any information that you want to teach into sort of different categories that you can give to student pairs or student groups and invite them to create an escape room around the material. Then it becomes this really fun group effort where everybody is putting in the excitement and the research and the detail work to make an interesting escape room because then their peers are going to play it.
Instead of you front-loading a hundred thousand hours of effort and then hoping that you can get them to buy in, and having, like, a really exciting 30 minutes, you spread that out and let students invest in the quality of the learning, to present information to each other. And I just think it’s a great way to turn this strategy into something that’s a little bit more practical for use because escape rooms are wonderful. It’s like creating a 12-course dinner for your family at dinner. Like, maybe you’re going to do it once every 10 years.

So you have the free template, which I’ll include for the show notes that’ll help teachers get started with this. What kind of constraints are built in so that this doesn’t take 10 hours of class time?
So with the template and, obviously, you can use my template, but you could also create a template of your own. It’s kind of like it’s just a set of slides that shows there’s one slide that’s the room. That’s in my version, it’s like a coffee shop. And there are different areas of it that are clickable. And if students click on the computer in their room, or the menu in the coffee shop, or the cell phone sitting over on the table, it takes them to another slide. Let’s take this cell phone for an example, that just has a text message conversation on it. And students are going to need to customize that text message conversation to share some information and hide a clue. And so it’s preset that there are kind of going to be five or six things for students to explore within the room that’s designed by the group.
They need to figure out how to convey their information about, like, the World War II battle or the type of poetry that they’re covering or whatever content you’ve invited them to share back with the class. They need to figure out how to embed that into these five little, moments in the escape room. And then there’s there’s kind of a place where they can create the the key where students have to put in their answers for the different locks to break out of the escape room. But because it’s kind of templated for them, it’s not going to get too out of control. It’s not going to take them 10 hours to create, and it’s not going to take you 10 hours to solve.
I bet kids love doing those.
Escape rooms are just unlike anything else. We live here in Bratislava, and half of my son’s friends here have escape room birthday parties.
#5) Synthesizing learning with one-pagers
So your last idea is, the one-pager. And this one I know is super versatile: this is one of my go-to’s as well
So a one-pager is basically a way for students to share what they’ve learned about almost anything, onto a single piece of paper through some kind of combination of imagery and words. And there’s this concept of dual coding that applies to one-pagers. It applies to sketch notes. Anything where students are processing kind of store and code that information. And so let’s say you’re reviewing before a big test and you want students to look back over the chapter and figure out all the key ideas, but you don’t want to just say reread the chapter, you don’t want to just say make a bulleted list of everything important in the chapter.
You might consider doing a one-pager and saying, like, Hey. I’ve given you this piece of paper. It’s kind of broken up into these different sections. I want you to put all the key terms up in the upper left with some illustrations of them. And I want you to put the equation that you feel is most important for you to remember in the upper right along with a crucial example of it. And I want you to draw a model of this concept in the very center circle and etcetera, etcetera. If you give them a guide like that, if you say, this is what we are reviewing or this is what we’re synthesizing and this is kind of a rough guide to how I want you to do it and a little bit of advice as to where to put what, it takes away some of the open-endedness of creating a one-page version of everything you’ve learned.
Like, that’s that’s a little bit terrifying in my experience. And so you give them that little bit of creative constraint. I’m most familiar, of course, with doing it for English. So for me, it’s like put the central theme in the middle of the page and the star that I’ve put for you in the middle and then illustrate it. And represent the protagonist in the bottom left section, find a crucial quotation that represents that protagonist, and draw an icon that represents their journey. And you kind of just mix and match ideas and visuals. And as students dive into that process and have to decide what’s truly important enough to go on their one single page, they really learn a lot. They learn a lot about what they’ve learned. And they start to really have it accessible.

Around how much class time do you recommend, dedicating to a project like this?
It depends, I guess, on how much depth you want to go with it. I think usually one classroom is going to be enough. But if you’re trying to do it as a summative assessment and you really want them to demonstrate everything that they’ve learned, then you might want to.
Are there any options for compiling them, sharing them, making them accessible? Like, once they had this wonderful finished product, is there something else that teachers can do with these in order for kids to see what other students have done and extend the learning?
Great point. For sure, one-pagers lend themselves beautifully to a gallery walk. If you’re using them as a review tool, then it’s even better in that way because students can actually be going around and learning from each other’s review.
It’s going to help them just continue to process information in new ways through both the visuals and the written elements. And then they create just stunning displays as well. So, the visual element of them is one of my favorite things about them. They’re they’re they’re fun to create. They’re they’re fun to learn from.
Betsy, I feel like you have, a community of educators who are super creative or they want to be super creative, and creativity is really important to them. What would you say to a teacher who’s listening to this and thinking, How does she come up with these ideas? Like, how did she think of this? When I think about planning my lessons, I literally just don’t know what to do. And I end up just looking through things online, I get overwhelmed. I look at what’s in the teacher’s guide and it’s super boring. How do I train myself to come up with these kinds of things and think of them myself?
Yeah. That’s really interesting. One of the tools I created a long time ago that’s kind of interesting for me, for myself, and then I’ve also shared with other teachers, I call the Ed Deck. And, you know, you could you could use mine or you could create one of your own. But it just has cards on it that each has the type of lesson that I’m interested in trying.
And so I have a card that says stations, and it kind of describes how I would set up stations. And I have a card that says hexagonal thinking, one that says escape rooms, one that says podcasting, and about 30 other things. And I like to keep this kind of rainbow-y deck of cards around. And if I don’t know what I want to do, I can flip through there or I can create a bulletin board of it or I can just have one card out that’s like the type of pedagogy I’m hoping to try sometime soon just as a reminder to me. And so some summer when you’re like all over Pinterest or Instagram or reading five PD books or whatever, you can you can create your own little deck of ideas instead of having kind of 37 saved Instagram posts and 27 Pinterest boards and all these screenshots from Facebook. I mean, those are all wonderful too, but it can be kind of overwhelming. If you can narrow them down to your favorites, that can kind of help you keep what you want to try at your fingertips.
I think that’s great advice because a lot of people who don’t consider themselves creative — that’s a whole another topic because, of course, everyone is creative, right? But it is a skill that you train in yourselves and a lot of people who don’t think of themselves as creative think that these ideas just come out of the blue, and they do sometimes. But also people who regularly create have structure systems references. Artists have notebooks full of ideas, sketchbooks. You’re constantly surrounding yourself with these things that get you inspired.
And that’s what I hear with this deck of ideas: it’s something to go to when you don’t feel that inspiration. When you have that spark of creativity, you record it and then you have it to reference later.
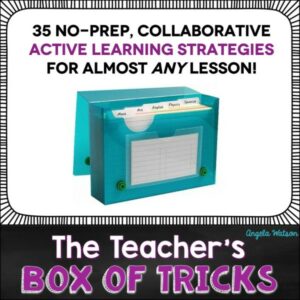
It’s interesting that you think of it as like a deck because, when I was in the classroom, I thought of mine as a index card box. So I called it “my box of tricks.” You know how teachers always seem to like pull out something out of their bag of tricks? But I didn’t want to keep them in a bag. That’s disorganized–hah! I want them organized, so that was my box of tricks.
And I actually created that resource (it’s in my TPT store and in my Truth for Teachers shop). They are a collection of go-to strategies that are open-ended and any teacher can plug them into any activity. Some are for lessons, some are for review, and things like that.
So when you’re like, Okay. I don’t know how to teach this topic or I don’t know how to review this topic, you can remember: These are things that have worked before. I think that’s so important to have a reference for yourself.
Like you said, you can use someone else’s collection of ideas as your base. You can spend some time in the summer or whenever just collecting ideas. Probably anyone reading or listening to this can think of ten things off the top of their head that they do which work really well, and that their students love. Just put it in a Google Doc and have it for yourself, and then add to it. Then you come up with something new, add it there, put it someplace so it’s all in one central idea bank. And then when you’re lesson planning, you can just pick and choose these things.
Yeah. Absolutely. I love that. I’ve always thought of teaching, you know, as a chance to just try out different things from, as you say, your kind of toolbox. Because in my experience, so many different PDs, so many different books will sort of say, this is the way. This is the one thing that you need to do from now on. And I’m always like, that’s a way. I like that way. I’m going to try that way. But I’m also I’m not going to throw out my 47 ways that I’ve gathered so far in my career. This is going to be number 48. And and that just makes it joyful. It’s just this process is a lifelong process of collecting ways of teaching that work. And we all know as educators, like, we see things in the world, and it gives us a new idea, and then we have a new way.
And that’s how you keep teaching from getting repetitive and boring. How you keep it fresh is to have these collections of ideas. And it’s interesting to see the differences between elementary and secondary teachers because I feel like with secondary teachers, a lot of times you’re teaching the same thing at the same time to multiple class periods, so it gets really boring. You’re, like, you can’t even remember. Did I say that to this group or to this group? And so that’s one challenge to keep yourself from being bored teaching the same thing multiple times all at once.
For elementary teachers, a lot of times, you don’t teach the same lesson again for a whole other year if you only teach one group of students so you forget what you did. And if you don’t have this database of ideas where you can look back and be like, Oh, yeah, this is a really cool thing that I could try, and kinda helps you get out of that rut and think about, okay, we’re just sort of like my my my most used strategies, the ones that I know for sure are going to work with students? And then I can just plug them into different things instead of always reinventing the wheel and trying to come up with an idea for every topic. Like, let me figure out how to teach solar systems. How do I teach adverbs? Like, there are versatile strategies.
You don’t have to find something specific to that. You know, like, with the moon phases, people will use Oreos, right, or cookies or something like that. You don’t have to have something that is specific to that topic. You can have a collection of ideas that are open-ended, like these podcast stations. You know, all of that kind of stuff can be applied to any topic, and then you’re not spending so much time looking for lesson ideas for one specific thing.
Yeah, I really agree. No. It’s it’s just, like, it’s a joyful process to just be collecting the things that you know you can truly trust.
More ideas for making lessons feel fresh and interesting
I also have a podcast. It’s called the Spark Creativity Teacher Podcast, and we talk exactly about things like this in pretty short episodes. Each one is kind of like a little quick workshop where you can get a strategy for your creative classroom. And then beyond that, you can find me at nosparkcreativity.com and explore, the podcast, my blog posts, and Instagram, and then I have a curriculum membership as well called The Lighthouse where I design these kinds of materials full-time all year long.
The Truth for Teachers Podcast
Our weekly audio podcast is one of the top K-12 broadcasts in the world, featuring our writers collective and tons of practical, energizing ideas. Support our work by subscribing in your favorite podcast app–everything is free!
Explore all podcast episodes


Angela Watson
Founder and Writer
Sign up to get new Truth for Teachers articles in your inbox


OR

Join our
community
of educators
If you are a teacher who is interested in contributing to the Truth for Teachers website, please click here for more information.


